Environments in SharePoint Online projects
Traditionally, and especially now, we all know how to work with environments in SharePoint on Premises. For development environments, each developer has a Virtual Machine (in his desktop, hosted in Azure, in some server of the company, etc.). In addition, there will be another specific farm for Continuous Integration and QA. However, with the arrival of SharePoint Online, this model is not as valid as we would like it to be, and we must search for alternatives. My recommendation is something like the following screenshot, which I will explain below: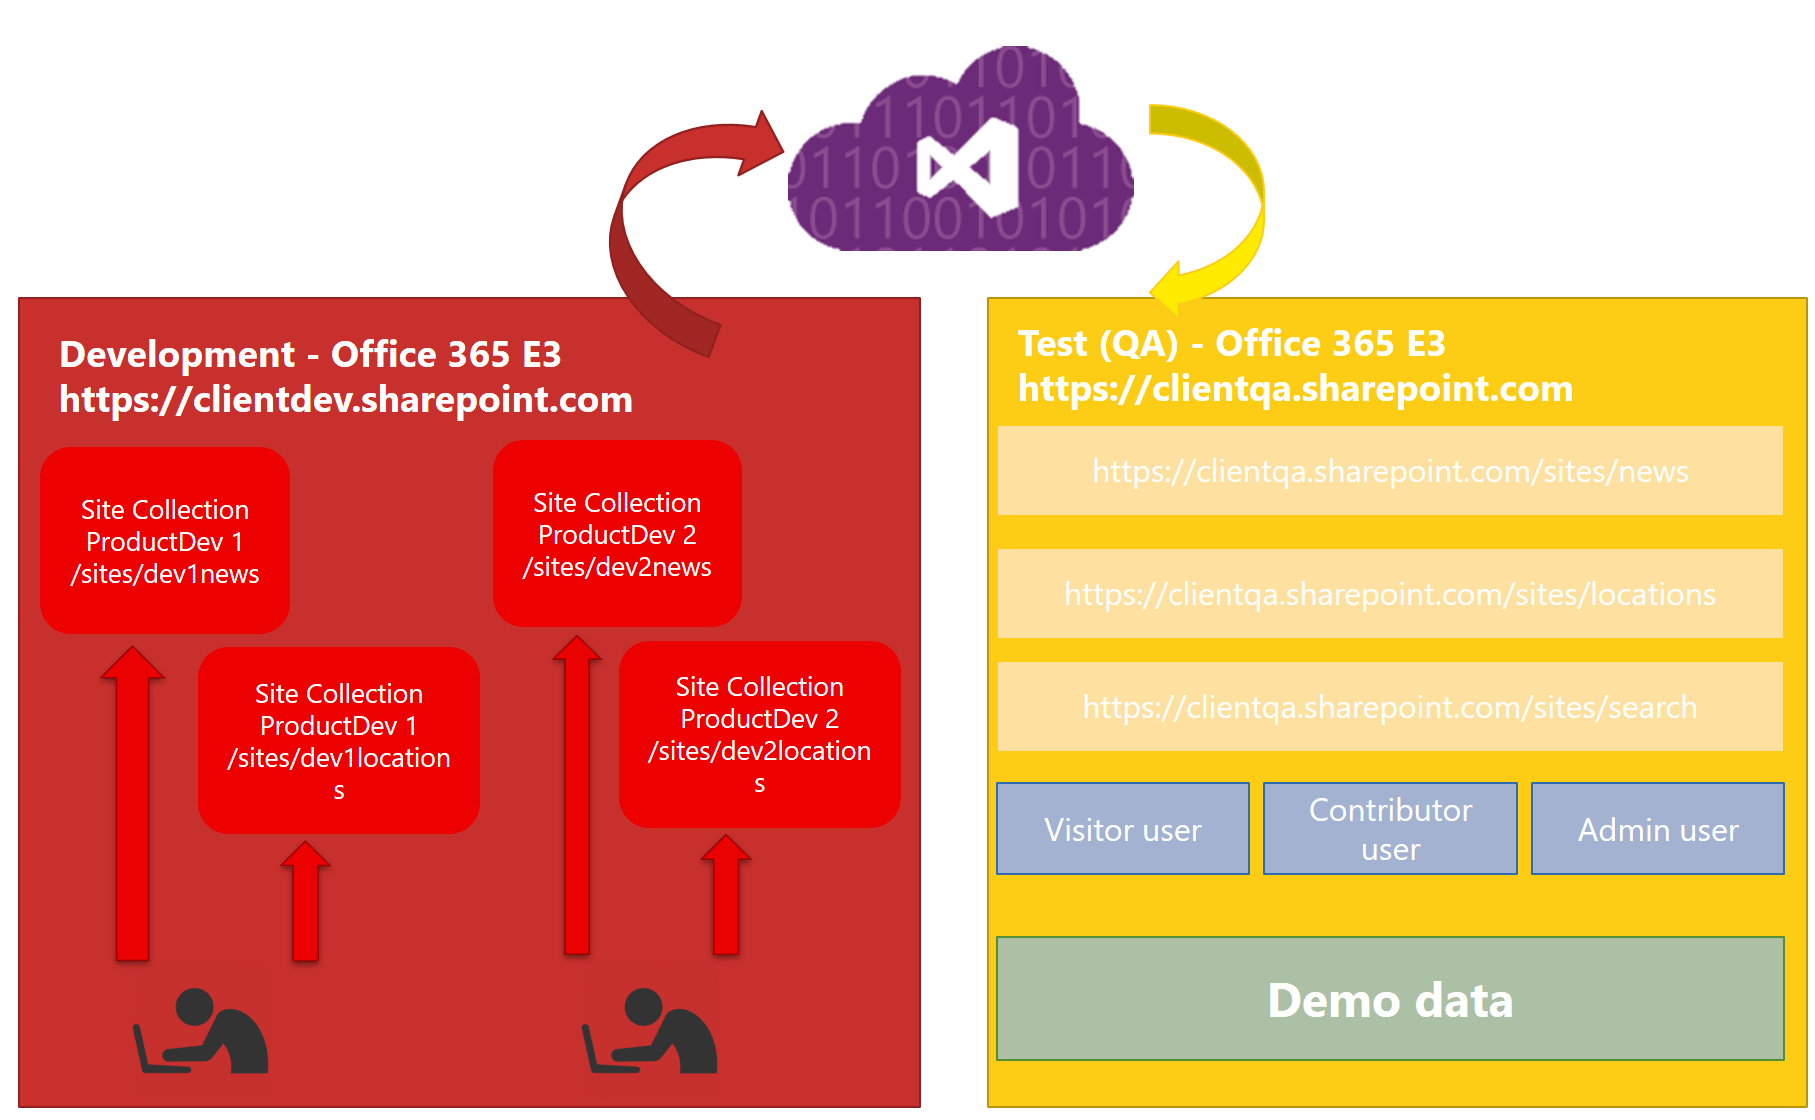
For the development environment, we will have an Office 365 Tenant, in a plan that will be enough for the project we are developing (E3, etc.). Inside this tenant, we will assign a specific Site Collection for each Developer, and we can even create a Site Collection for each Developer-Module/Product, if our project is very big and it is divided in different Modules or Products, like, for instance, a specific module for News, or for Search, or for Locations, etc. Using tools like Gulp, we can easily make that each developer “points” to his own Site Collection, and the changes of a developer do not affect another’s changes. For this development tenant, we can have only one valid license that all the developers will share.
For the QA environment, we will have a tenant different from Office 365. In this case I recommend that the contracted plan to be the same than in the Production tenant. Moreover, since it will be the environment for the QA team, it is advisable to have different licenses/users so at least we can test the different roles that our project needs (at least 3, to be able to test with a Visitor, Contributor and Admin user). In the QA tenant, we will create a Site Collection for each module: Root, News, Offices…what our project may require. In addition, it is very important that we get a dataset very similar to the one we will find in production, because this will be vital for testing. To do this, the PnP itself can be useful, since the templates can contain test data to insert item in lists, files, etc.
Finally, the step from development to QA will be completely automated using a Team Services Build. Thus, the build will be programmed for executing, or periodically (diary), or in each commit to the code Control, updating the QA environment with the last development changes.
Configuring the CI Build for SharePoint Online
At this point, let’s see how we can configure a Build in Team Service that deploys our solution in a tenant of SharePoint Online. But first, for this example and the following screenshots, you can download the following project from my GitHub repository
The first thing we need in the solution is a console project that uses the PnP Framework to deploy our template or templates. This action is very easy using PnP and here you have the code snippet to do it: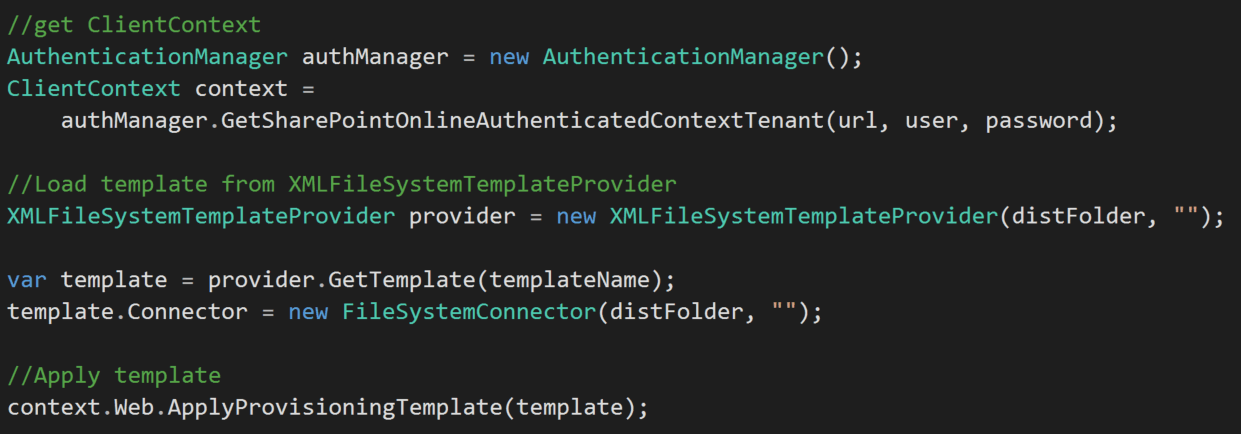
We will call this console application from our build, to launch the remote provisioning process through PnP.
Note: Ideally at this point, we would use the PowerShell commands of PnP. However, those commands need an installation (or manual registry), inside the machine. Unfortunately, when I write this article, there is no way to do something like this in the machine where the Cloud Agent is executed, therefore we need to execute our own application to apply the PnP template.Creating a new Build in Team Services
First, when we press the button of New Build, we have available different templates, depending on the type of project we have. Initially, we will work with Visual Studio template.
Building our solution on VS
Our next step will be to select which source control we are working with (GitHub, VSTS, Subversion…), as well as the branch that we will use by default. In addition, we will select the type of Agent we want to use. The Agent is where all the magic happens, and we have 2 options: we can use the local server as Agent (this will be the case when working with SharePoint on Premises. or using an Agent hosted in Team Services itself (this is known as Cloud Agent since as TS, it will run in the cloud).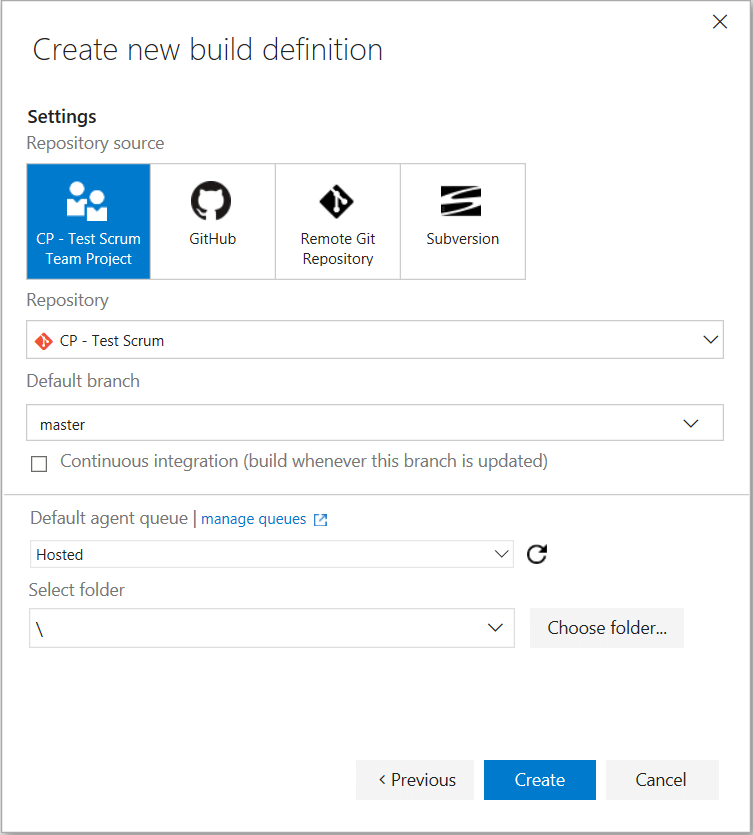
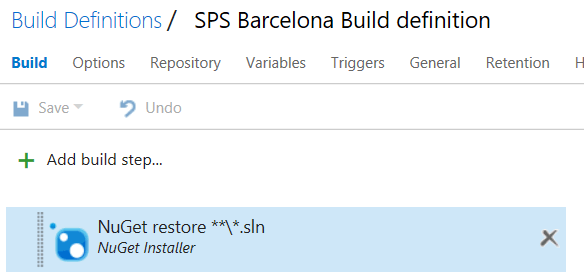
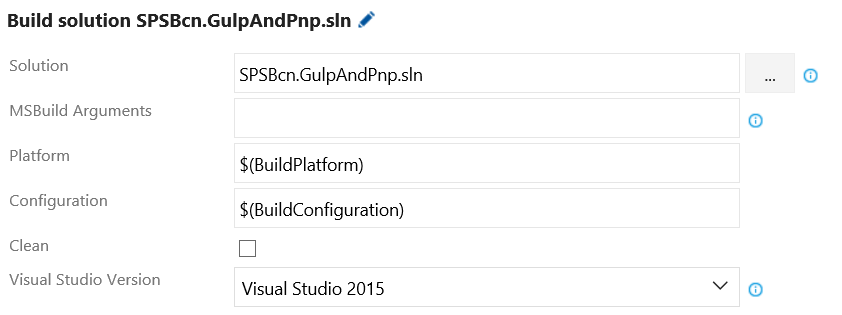
Our first action, which will be configured by default after selecting the VS template, will be to restore all the Nuget packages required in our Solution.

Executing Gulp Tasks
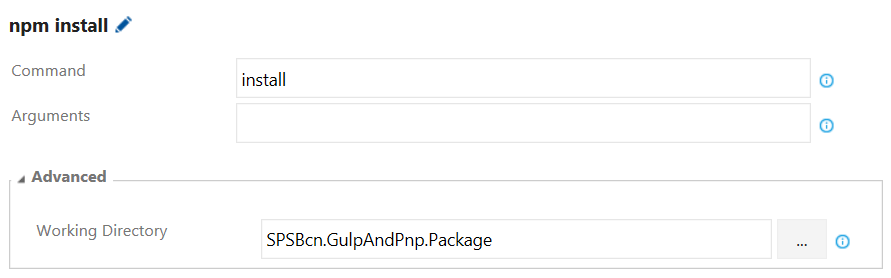
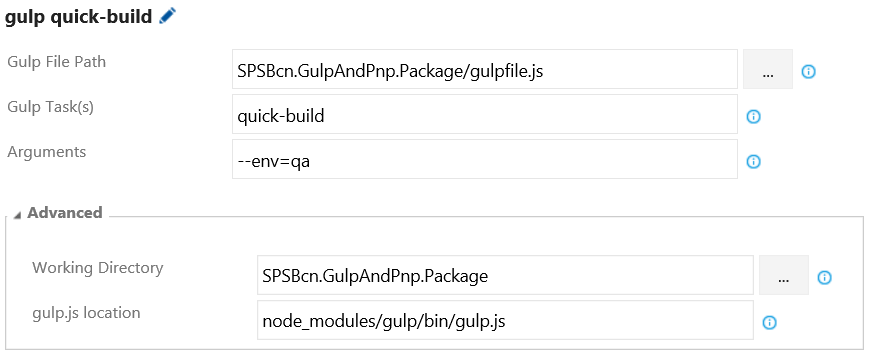
The next step will be to execute some Gulp tasks that we have in our Project. I recommend you to review the example code used in the article. You will see we use Gulp for some tasks, like for example, concatenate all the JS files in a single .min.js and besides, compress it to improve the performance. Moreover, we have other Gulp tasks, like applying token replacements in the XML templates of PnP, compile SASS to CSS, etc.Therefore, the first step to use Gulp in our Build will be to restore the packages required by Gulp. To do this, we will use NPM Step.

And we will configure the Step to make it point to our Project (Working directory) where we use Gulp:
Once we restore the packages that Gulp requires, we will create a new Gulp Step:

Remote Provisioning using PnP

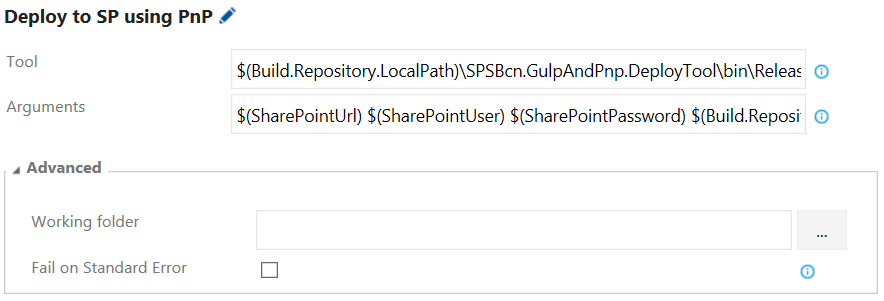
And we will configure it to use the console application of our solution, besides giving some required arguments for the console:
Where:
- Tool: It is the location of the Console application already compiled in a previous step. Here we can use different Tokens that Team Services gives us. In this case, we will need:
$(Build.Repository.LocalPath)\SPSBcn.GulpAndPnp.DeployTool\bin\Release\SPSBcn.GulpAndPnp.DeployTool.exe - Arguments: Different parameters required by the console application. In our case, we need the data of connection to SharePoint: URL, User, Passwords, as well as the location of the XML file with the PnP template.
$(SharePointUrl)$(SharePointUser)$(SharePointPassword) $(Build.Repository.LocalPath)\SPSBcn.GulpAndPnp.Package\dist\src\pnp\ProvisioningTemplate.Package.xml
In this case, besides using the Tokens predefined in Team Services, we will use the Variables defined in the Build. We can configure them from the Variables Tab:

See how we can mark a variable as “Password” type (lock icon), so the value will not appear in the screen, but Team Services will decode it and send it in the Step execution.
Build Triggers
In last step, we will configure how we want to execute the Build. To do this, we will go to the Triggers tab, and we will choose the option that better suits our needs: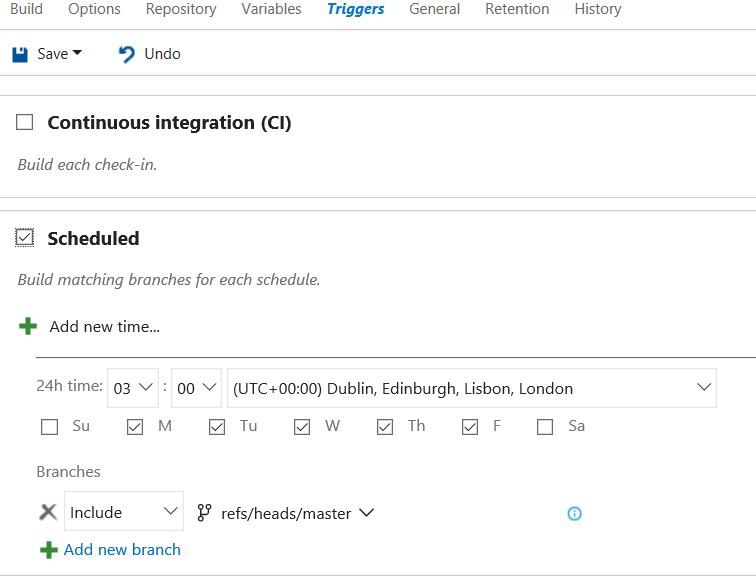
Following PnP Program
- MS Tech Community: Replacing the previous Yammer network
- PnP Channel in YouTube: Replacing also the existing Channel 9
- Community call